Do you like WhatsApp web authentication? Well, Whatsapp web has always fascinated me with its simplicity of QR-Code based authentication. Though there are similar authentication UI’s available out there since then, I always wondered what if remote secure shell (SSH) can be authenticated with QR Code with this kind of simplicity at the same time keeping auth process secure. In this guide, we will see how to write and implement a bare-bones PAM module for openSSH Linux-based system.
OpenSSH is the premier connectivity tool for remote login with the SSH protocol. It encrypts all traffic to eliminate eavesdropping, connection hijacking, and other attacks. In addition, OpenSSH provides a large suite of secure tunneling capabilities, several authentication methods, and sophisticated configuration options.
– openssh.com
Meet PAM!
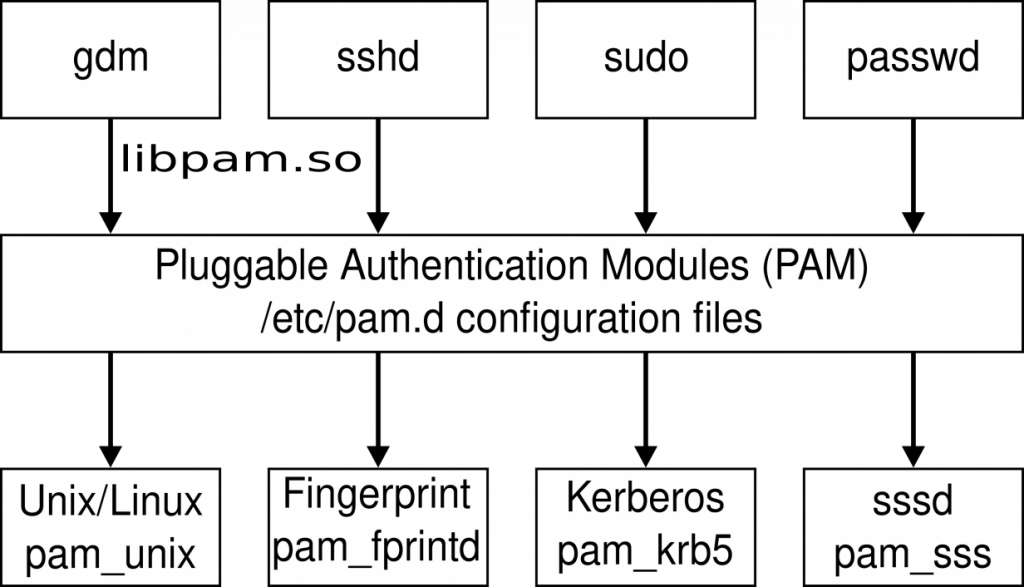
PAM short for “Pluggable Authentication Module” is a middleware that abstracts authentication features on Linux and UNIX-like operating systems. PAM has been around for more than two decades now. The authentication process could be cumbersome with each service looking for authenticating users with a different set of hardware and software such as username-password, fingerprint module, face recognization, two-factor authentication, LDAP, etc. But the underneath process remains the same, i.e users must be authenticated as who they say they are. This is where PAM comes into the picture and provides an API’s to the application layer and provides built-in functions to implement and extend PAM capability.
Understand how OpenSSH interacts with PAM
On Linux host OpenSSH (sshd daemon), begins by reading the configuration defined in /etc/pam.conf or alternatively in /etc/pam.d configuration files. The config files are usually defined with service names having various realms (auth, account, session, password). The “auth” realm is what takes care of authenticating users as who they say. Typical sshd PAM service file on Ubuntu OS looks as below and you can relate with your own flavor of Linux:
@include common-auth
account    required     pam_nologin.so
@include common-account
session [success=ok ignore=ignore module_unknown=ignore default=bad]        pam_selinux.so close
session    required     pam_loginuid.so
session    optional     pam_keyinit.so force revoke
@include common-session
session    optional     pam_motd.so  motd=/run/motd.dynamic
session    optional     pam_motd.so noupdate
session    optional     pam_mail.so standard noenv # [1]
session    required     pam_limits.so
session    required     pam_env.so # [1]
session    required     pam_env.so user_readenv=1 envfile=/etc/default/locale
session [success=ok ignore=ignore module_unknown=ignore default=bad]        pam_selinux.so open
@include common-password
common-auth file has “auth” realm with pam_unix.so PAM module, which is responsible for authenticating user with password. Our goal is to write PAM module that replaces pam_unix.so with our own version.
When OpenSSH makes calls to the PAM module, the very first function it looks for is “pam_sm_authenticate“, along with some other mandatory function such as pam_sm_setcred. Thus we will be implementing the pam_sm_authenticate function and will be an entry point to our shared object library. The module should return PAM_SUCCESS (0) as the return code for successful authentication.
Application Architecture
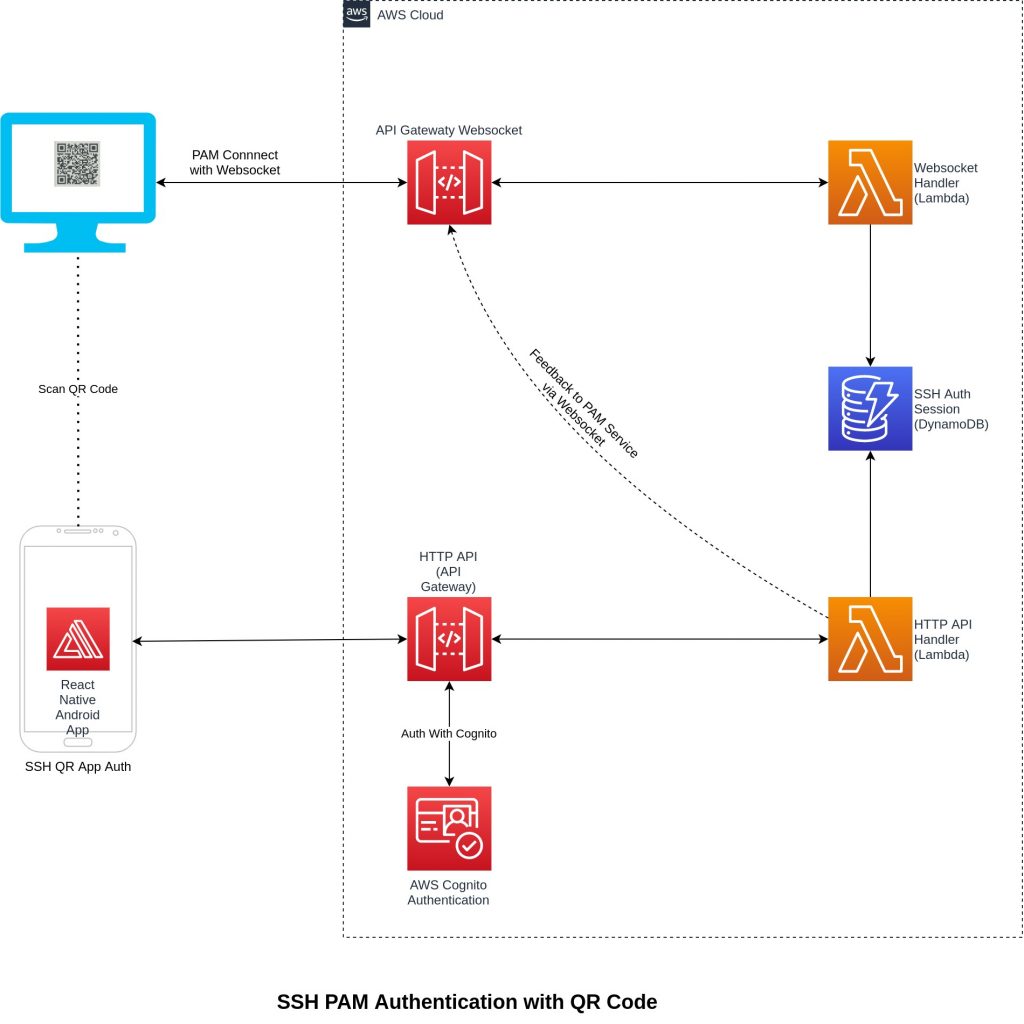
The project architecture has four main applications. Backend is hosted on AWS cloud with minimal and low-cost infrastructure resources.
- PAM Module : Provides QR-Code auth prompt to client SSH Login
- Android Mobile App: Authenticates SSH login by scanning QR Code.
- QR Auth Server API : Backend application to which our Android App connects and communicates and shares authentication payload along with some other meta information.
- Websocket Server (API Gateway Websocket, and NodeJS) App: PAM Module and and Server Side App shares auth message payload in realtime.
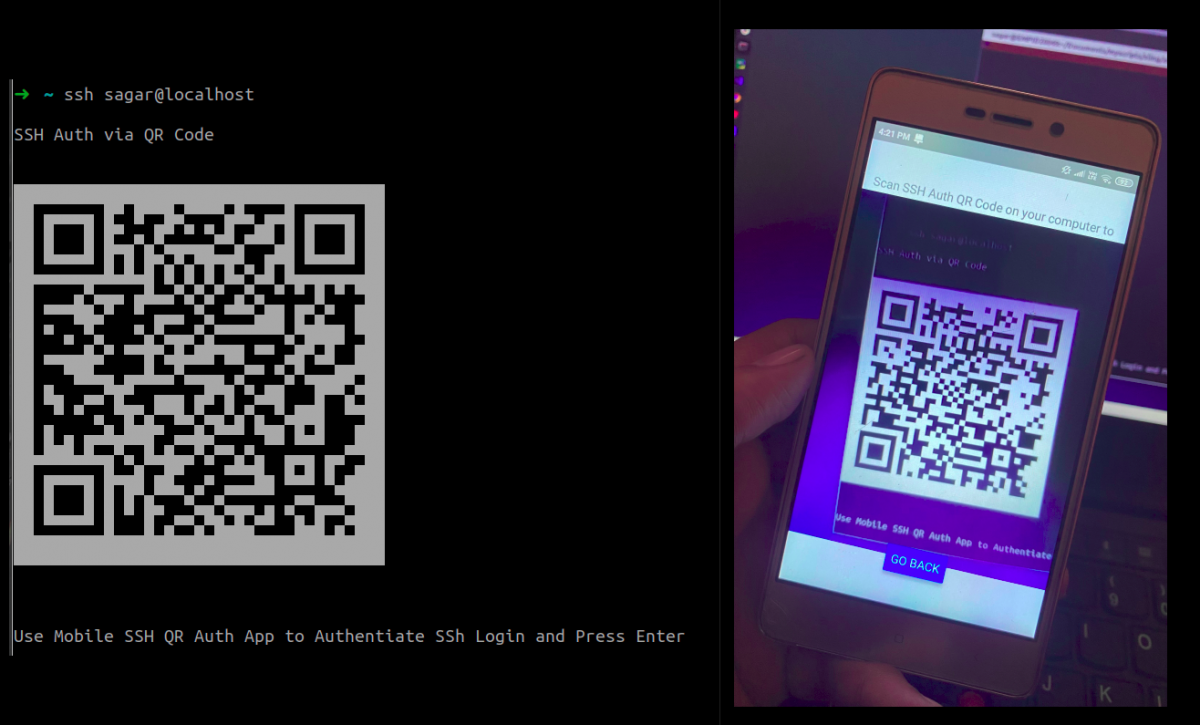
When a user connects to the remote server via SSH, a PAM module is triggered offering a QR Code for authentication. Information is exchanged between API gateway WebSocket which in terms saves temporary auth data in DynamoDB. A user then uses an Android mobile app (written in react-native) to scan the QR code. Upon scanning app connects to API Gateway. An API call is first authenticated by AWS Cognito to avoid any intrusion. The request is then proxied to the Lambda function, which authenticates input payload comparing information available in DynamoDB. Upon successful authentication, the Lambda function makes a call to API gateway WebSocket to inform the PAM to authenticate the user.
Framework and Toolchains

PAM modules are shared object libraries and thus need to be written in C (although other languages can be used to compile and link or probably make cross programming language calls like python pam or pam_exec). Below are the framework and toolset I am using to serve this project.
- gcc, make, automake, autoreconf, libpam (GNU dev tools on Ubuntu OS)
- libqrencode, libwebsockets, libpam, libssl, libcrypto ( C libraries)
- NodeJS, express (for serverside app)
- API gateway and API Gateway websocket, AWS Lamba (AWS Cloud Services for hosting serverless server side app)
- Serverless framework (for easily deploying infrastructure)
- react-native, react-native-qrcode-scanner (for Android mobile app)
- AWS Cognito (for authentication)
- AWS Amplify Library
This guide assumes you have a basic understanding of the Linux OS, C programming language, pointers, and gcc code compilation. For the backend API’s I prefer to use NodeJS as a primary programming language but you may opt language of your choice for designing HTTP API’s.
Authentication with QR Code PAM
When the module initializes, we first want to generate a random string with the help “/dev/urandom” character device. Byte string obtained from this device contains non-screen characters and hence we encode them with Base64. Let’s call this string an auth verification string.
void get_random_string(char *random_str,int length)
{
	FILE *fp = fopen("/dev/urandom","r");

	if(!fp){
		perror("Unble to open urandom device");
		exit(EXIT_FAILURE);
	}

	fread(random_str,length,1,fp);
	fclose(fp);
}
char random_string[11];

    //get random string
    get_random_string(random_string,10);

    //convert random string to base64 coz input string is coming from /dev/urandom and may contain binary chars
    const int encoded_length = Base64encode_len(10);
    base64_string=(char *)malloc(encoded_length+1);
    Base64encode(base64_string,random_string,10);

    base64_string[encoded_length]='\0';
We then initiate a WebSocket connection with the help of libwebsockets library and connect to our API Gateway WebSocket endpoint. Once the connection is established, we inform that a user may try to authenticate with auth verification string. API Gateway WebSocket returns a unique connection id to our PAM module.
static void connect_client(struct lws_sorted_usec_list *sul)
{
    struct vhd_minimal_client_echo *vhd =
		lws_container_of(sul, struct vhd_minimal_client_echo, sul);
	struct lws_client_connect_info i;
	char host[128];

	lws_snprintf(host, sizeof(host), "%s:%u", *vhd->ads, *vhd->port);

	memset(&i, 0, sizeof(i));

	i.context = vhd->context;
	//i.port = *vhd->port;
    i.port = *vhd->port;
	i.address = *vhd->ads;
	i.path = *vhd->url;
	i.host = host;
	i.origin = host;
	i.ssl_connection = LCCSCF_USE_SSL | LCCSCF_ALLOW_SELFSIGNED | LCCSCF_SKIP_SERVER_CERT_HOSTNAME_CHECK | LCCSCF_PIPELINE;
    //i.ssl_connection = 0;
	if ((*vhd->options) & 2)
		i.ssl_connection |= LCCSCF_USE_SSL;
	i.vhost = vhd->vhost;
	i.iface = *vhd->iface;
	//i.protocol = ;
	i.pwsi = &vhd->client_wsi;

	//lwsl_user("connecting to %s:%d/%s\n", i.address, i.port, i.path);

    log_message(LOG_INFO,ws_applogic.pamh,"About to create connection %s",host);

	//return !lws_client_connect_via_info(&i);

    if (!lws_client_connect_via_info(&i))
		lws_sul_schedule(vhd->context, 0, &vhd->sul,
				 connect_client, 10 * LWS_US_PER_SEC);
}
Upon receiving the connection id from the server, the PAM module converts this connection id to SHA1 hash string and finally composes a unique string for generating QR Code. This string consists of three parts separated by colons (:), i.e “qrauth:BASE64(AUTH_VERIFY_STRING):SHA1(CONNECTION_ID)”. For example, let’s say a random Base64 encoded string is “UX6t4PcS5doEeA==” and connection id is “KZlfidYvBcwCFFw=” then the final encoded string is “qrauth:UX6t4PcS5doEeA==:2fc58b0cc3b13c3f2db49a5b4660ad47c873b81a“. This string is then encoded to UTF-8 QR Code with the help of libqrencode library and the authentication screen is prompted by PAM module.
            char *con_id=strstr(msg,ws_com_strings[READ_WS_CONNECTION_ID]);
            int length = strlen(ws_com_strings[READ_WS_CONNECTION_ID]);

            if(!con_id){
                pam_login_status=PAM_AUTH_ERR;
                interrupted=1;
                return;
            }

            con_id+=length;
            log_message(LOG_DEBUG,ws_applogic.pamh,"strstr is %s",con_id);
            string_crypt(ws_applogic.sha_code_hex, con_id);

            sprintf(temp_text,"qrauth:%s:%s",ws_applogic.authkey,ws_applogic.sha_code_hex);

            char *qr_encoded_text=get_qrcode_string(temp_text);
            ws_applogic.qr_encoded_text=qr_encoded_text;

            conv_info(ws_applogic.pamh,"\nSSH Auth via QR Code\n\n");
            conv_info(ws_applogic.pamh, ws_applogic.qr_encoded_text);

            log_message(LOG_INFO,ws_applogic.pamh,"Use Mobile App to Scan \n %s",ws_applogic.qr_encoded_text);
            log_message(LOG_INFO,ws_applogic.pamh,"%s",temp_text);


            ws_applogic.current_action=READ_WS_AUTH_VERIFIED;

            sprintf(temp_text,ws_com_strings[SEND_WS_EXPECT_AUTH],ws_applogic.authkey,ws_applogic.username);
            websocket_write_back(wsi,temp_text,-1);

            conv_read(ws_applogic.pamh,"\n\nUse Mobile SSH QR Auth App to Authentiate SSh Login and Press Enter\n\n",PAM_PROMPT_ECHO_ON);

API Gateway Websocket App
We used a serverless framework for easily creating and deploying our infrastructure resources. With serverless cli, we use aws-nodejs template (serverless create --template aws-nodejs). Below is the template YAML definition. Note that DynamoDB resource has TTL set to expires_at property. This field holds the UNIX epoch timestamp. What this means is, any record that we store is automatically deleted as per the epoch time set. We plan to keep the record only for 5 minutes. This also means the user must authenticate himself within 5 minutes of the authentication request to the remote ssh server.
service: ssh-qrapp-websocket
frameworkVersion: '2'
useDotenv: true
provider:
  name: aws
  runtime: nodejs12.x
  lambdaHashingVersion: 20201221
  websocketsApiName: ssh-qrapp-websocket
  websocketsApiRouteSelectionExpression: $request.body.action
  region: ap-south-1

  iam:
    role:
      statements:
        - Effect: Allow
          Action:
            - "dynamodb:query"
            - "dynamodb:GetItem"
            - "dynamodb:PutItem"
          Resource:
            - Fn::GetAtt: [ SSHAuthDB, Arn ]

  environment:
    REGION: ${env:REGION}
    DYNAMODB_TABLE: SSHAuthDB
    WEBSOCKET_ENDPOINT: ${env:WEBSOCKET_ENDPOINT}
    NODE_ENV: ${env:NODE_ENV}
package:
  patterns:
    - '!node_modules/**'
    - handler.js
    - '!package.json'
    - '!package-lock.json'
plugins:
  - serverless-dotenv-plugin
layers:
  sshQRAPPLibs:
    path: layer
    compatibleRuntimes:
      - nodejs12.x
functions:
  connectionHandler:
    handler: handler.connectHandler
    timeout: 60
    memorySize: 256
    layers:
      - {Ref: SshQRAPPLibsLambdaLayer}
    events:
      - websocket:
         route: $connect
         routeResponseSelectionExpression: $default
  disconnectHandler:
    handler: handler.disconnectHandler
    memorySize: 256
    timeout: 60
    layers:
      - {Ref: SshQRAPPLibsLambdaLayer}
    events:
      - websocket: $disconnect
  defaultHandler:
    handler: handler.defaultHandler
    memorySize: 256
    timeout: 60
    layers:
      - {Ref: SshQRAPPLibsLambdaLayer}
    events:
      - websocket: $default
  customQueryHandler:
    handler: handler.queryHandler
    memorySize: 256
    timeout: 60
    layers:
      - {Ref: SshQRAPPLibsLambdaLayer}
    events:
      - websocket:
         route: expectauth
         routeResponseSelectionExpression: $default
      - websocket:
         route: getconid
         routeResponseSelectionExpression: $default
      - websocket:
         route: verifyauth
         routeResponseSelectionExpression: $default

resources:
  Resources:
    SSHAuthDB:
      Type: AWS::DynamoDB::Table
      Properties:
        TableName: ${env:DYNAMODB_TABLE}
        AttributeDefinitions:
          - AttributeName: authkey
            AttributeType: S
        KeySchema:
          - AttributeName: authkey
            KeyType: HASH
        TimeToLiveSpecification:
          AttributeName: expires_at
          Enabled: true
        ProvisionedThroughput:
          ReadCapacityUnits: 2
          WriteCapacityUnits: 2
API Gateway WebSocket has three custom events. This event comes as an argument to lambda function in “event.body.action“. API Gateway WebSocket calls them as route selection expression. These custom events are :
- “expectauth” event is sent by PAM module to WebSocket informing that a client has asked for authentication and mobile application may try to authenticate by scanning QR Code. During this event, the WebSocket handler stores the connection id along with auth verification string. This key acts as a primary key to our DynamoDB table.
- “getconid” event is sent to retrieve the current connection id so that PAM module can generate a SHA1 sum and provide a QR Code prompt.
- “verifyauth” event is sent by the PAM module to confirm and verify authentication. During this, even the WebSocket server expects random challenge response text. WebSocket server retrieves data payload from DynamoDB with auth verification string as primary key, and tries to find the key “authVerified” marked as “true” (more on this later).
  queryHandler: async (event,context) => {

    const payload = JSON.parse(event.body);
    const documentClient = new DynamoDB.DocumentClient({
      region : process.env.REGION
    });

    try {

      switch(payload.action){
        case 'expectauth':

          const expires_at = parseInt(new Date().getTime() / 1000) + 300;

          await documentClient.put({
            TableName : process.env.DYNAMODB_TABLE,
            Item: {
              authkey : payload.authkey,
              connectionId : event.requestContext.connectionId,
              username : payload.username,
              expires_at : expires_at,
              authVerified: false
            }
          }).promise();

          return {
            statusCode: 200,
            body : "OK"
          };

        case 'getconid':
          return {
            statusCode: 200,
            body: `connectionid:${event.requestContext.connectionId}`
          };

        case 'verifyauth':

          const data = await documentClient.get({
            TableName : process.env.DYNAMODB_TABLE,
            Key : {
              authkey : payload.authkey
            }
          }).promise();

          if(!("Item" in data)){
            throw "Failed to query data";
          }

          if(data.Item.authVerified === true){
            return {
              statusCode: 200,
              body: `authverified:${payload.challengeText}`
            }
          }

          throw "auth verification failed";

      }

    } catch (error) {
      console.log(error);
    }

    return {
      statusCode:  200,
      body : "ok"
     };

  }
Android App: SSH QR Code Auth
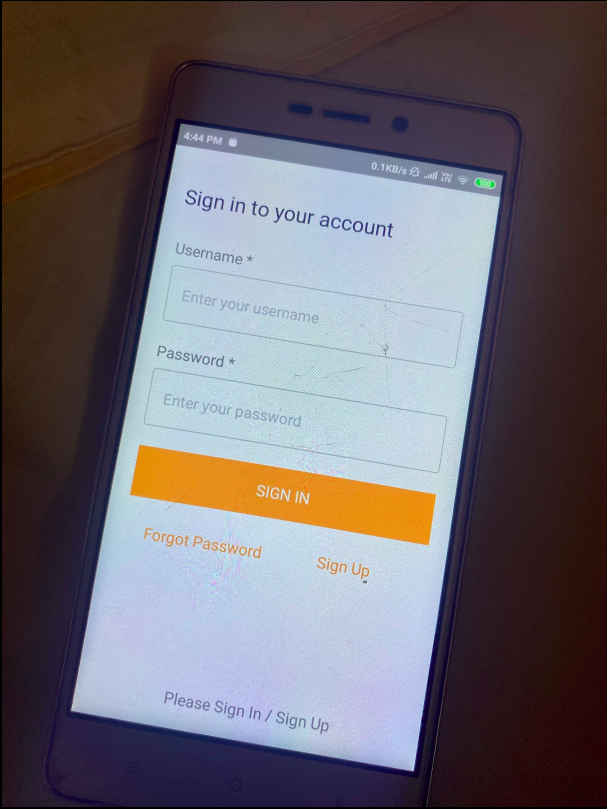
App Login Screen 
App Home Screen 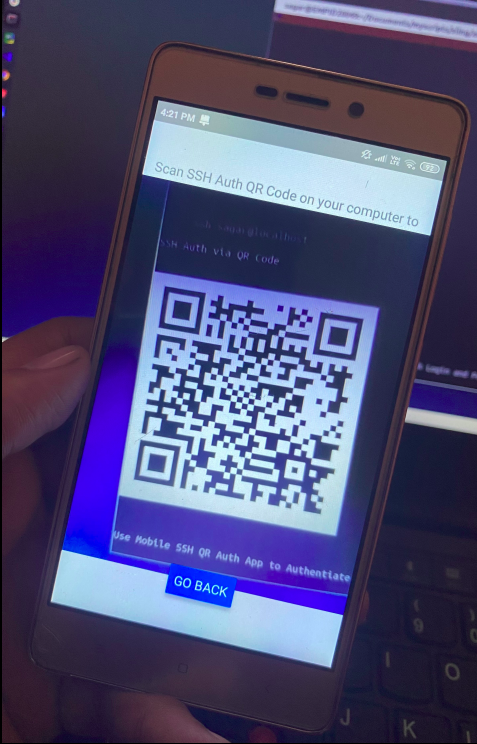
App Trying to Auth
The android app consists of two parts. App login and Scanning the QR code for authentication. Thanks to the AWS Cognito and Amplify library that ease out the process of a secure login. Just wrapping your react-native app with “withAutheticator” component you get ready to use “Login Screen”. We then use the react-native-qrcode-scanner component to scan the QR Code. This component returns decoded string on the successful scan. Application logic then breaks the string and find’s the validity of the string decoded. If the decoded string is a valid application string, an API call is made to the server with the appropriate payload.
render(){
    return (
      <View style={styles.container}>
        {this.state.authQRCode ?
        <AuthQRCode
         hideAuthQRCode = {this.hideAuthQRCode}
         qrScanData = {this.qrScanData}
        />
        :
        <View style={{marginVertical: 10}}>
        <Button title="Auth SSH Login" onPress={this.showAuthQRCode} />
        <View style={{margin:10}} />
        <Button title="Sign Out" onPress={this.signout} />
        </View>

        }
      </View>
    );
  }
      const scanCode = e.data.split(':');

      if(scanCode.length <3){
        throw "invalid qr code";
      }

      const [appstring,authcode,shacode] = scanCode;

      if(appstring !== "qrauth"){
        throw "Not a valid app qr code";
      }

      const authsession = await Auth.currentSession();
      const jwtToken = authsession.getIdToken().jwtToken;

      const response = await axios({
        url : "https://API_GATEWAY_URL/v1/app/sshqrauth/qrauth",
        method : "post",
        headers : {
          Authorization : jwtToken,
          'Content-Type' : 'application/json'
        },
        responseType: "json",
        data : {
          authcode,
          shacode
        }
      });

      if(response.data.status === 200){
        rescanQRCode=false;
        setTimeout(this.hideAuthQRCode, 1000);
      }
This guide does not cover how to deploy react-native Android applications. you may refer official react-native guide to deploy your application to the android mobile device.
QR Auth API
The QR Auth API is built using a serverless framework with aws-nodejs template. It uses API Gateway as HTTP API and AWS Cognito for authorizing input request. The serverless YAML definition is defined below.
service: ssh-qrauth-server

frameworkVersion: '2 || 3'

useDotenv: true

provider:
  name: aws
  runtime: nodejs12.x
  lambdaHashingVersion: 20201221
  deploymentBucket:
    name: ${env:DEPLOYMENT_BUCKET_NAME}
  httpApi:
    authorizers:
      cognitoJWTAuth:
        identitySource: $request.header.Authorization
        issuerUrl: ${env:COGNITO_ISSUER}
        audience:
          - ${env:COGNITO_AUDIENCE}
  region: ap-south-1
  iam:
    role:
      statements:
      - Effect: "Allow"
        Action:
          - "dynamodb:Query"
          - "dynamodb:PutItem"
          - "dynamodb:GetItem"
        Resource:
          - ${env:DYNAMO_DB_ARN}
      - Effect: "Allow"
        Action:
          - "execute-api:Invoke"
          - "execute-api:ManageConnections"
        Resource:
          - ${env:API_GATEWAY_WEBSOCKET_API_ARN}/*
  environment:
    REGION: ${env:REGION}
    COGNITO_ISSUER: ${env:COGNITO_ISSUER}
    DYNAMODB_TABLE: ${env:DYNAMODB_TABLE}
    COGNITO_AUDIENCE: ${env:COGNITO_AUDIENCE}
    POOLID: ${env:POOLID}
    COGNITOIDP: ${env:COGNITOIDP}
    WEBSOCKET_ENDPOINT: ${env:WEBSOCKET_ENDPOINT}

package:
  patterns:
    - '!node_modules/**'
    - handler.js
    - '!package.json'
    - '!package-lock.json'
    - '!.env'
    - '!test.http'

plugins:
  - serverless-deployment-bucket
  - serverless-dotenv-plugin

layers:
  qrauthLibs:
    path: layer
    compatibleRuntimes:
      - nodejs12.x

functions:
  sshauthqrcode:
    handler: handler.authqrcode
    memorySize: 256
    timeout: 30
    layers:
      - {Ref: QrauthLibsLambdaLayer}
    events:
      - httpApi:
          path: /v1/app/sshqrauth/qrauth
          method: post
          authorizer:
            name: cognitoJWTAuth
Once API Gateway authenticates the incoming requests, control is handed over to the serverless-express router. At this stage, we verify the payload for auth verify string which is scanned by the Android mobile app. This auth verify string must be available in the DynamoDB table. Upon retrieving the record pointed by auth verification string, we read the connection id property and convert it to SHA1 hash. If the hash matches with the hash available in the request payload, we update the record “authVerified” as “true” and inform to PAM module via API Gateway WebSocket API. PAM Module then takes care of further validating via challenge response text.
The entire authentication flow is depicted in a flow diagram and architecture is depicted in the cover post of this blog.

Compiling and Installing PAM module
Unlike any other C programs, PAM modules are shared libraries. Therefore the compiled code when loaded in memory may go at an arbitrary place. Thus module must be compiled as position independent. With gcc while compiling we must pass -fPIC option. Further while linking and generating shared object binary, we should use -shared flag.
gcc -I$PWD -fPIC -c $(ls *.c)
gcc -shared -o pam_qrapp_auth.so $(ls *.o) -lpam -lqrencode -lssl -lcrypto -lpthread -lwebsockets
To ease this process of compiling and validating libraries, I prefer to use autoconf tool. The entire project is checked out at my GitHub repository along with autoconf scripts.
Once the shared object file is generated (pam_qrapp_auth.so), copy this file to “/usr/lib64/security/” directory and run ldconfig command to inform OS new shared library is available. Remove common-auth (from /etc/pam.d/sshd if applicable) or any line that uses “auth” realm with pam_unix.so module recursively used in /etc/pam.d/sshd. pam_unix.so module enforces a password or private key authentication. We then need to add our module to auth realm (“auth required pam_qrapp_auth.so”). Depending upon your Linux flavor, your /etc/pam.d/sshd file may look similar to below:
auth       required     pam_qrapp_auth.so
account    required     pam_nologin.so
@include common-account
session [success=ok ignore=ignore module_unknown=ignore default=bad]        pam_selinux.so close
session    required     pam_loginuid.so
session    optional     pam_keyinit.so force revoke
@include common-session
session    optional     pam_motd.so  motd=/run/motd.dynamic
session    optional     pam_motd.so noupdate
session    optional     pam_mail.so standard noenv # [1]
session    required     pam_limits.so
session    required     pam_env.so # [1]
session    required     pam_env.so user_readenv=1 envfile=/etc/default/locale
session [success=ok ignore=ignore module_unknown=ignore default=bad]        pam_selinux.so open
@include common-password
Finally, we also need to configure our sshd daemon configuration file to allow challenge response authentication. Open file /etc/ssh/sshd_config and add “ChallengeResponseAuthentication yes” if already not available or commented or set to “no“. Reload the sshd service by issuing the command “systemctl reload sshd“. Voila, and we are done here.
Conclusion
This guide was bare bone tutorials and not meant for production use. There are certain flaws to this PAM module. For example, our module should prompt for changing the password if the password is expired or login should be denied if an account is a locked and similar feature that addresses security. Also, the android mobile app should be bound with ssh username so that, AWS Cognito user bound with ssh username could only authenticate.
One known limitation to the PAM module is we have to always hit enter after scanning the QR Code via Android Mobile App. This limitation is because of how OpenSSH itself is implemented. OpenSSH server blocks all the informational text unless there is user input is required. In our case, informational text is UTF8 QR Code itself. However, there is no such input is required from the interactive device, as the authentication event comes from the WebSocket to PAM module. If we do not ask the user to exclusively press enter after scanning the QR Code our QR Code will never be displayed. Thus input here is a dummy. This is a known issue for OpenSSH PAM_TEXT_INFO , you may find more about the issue here.
References:
- https://en.wikipedia.org/wiki/Pluggable_authentication_module
- https://www.redhat.com/sysadmin/pluggable-authentication-modules-pam
- https://stackoverflow.com/questions/52869368/custom-pam-for-sshd-in-c
- https://bugzilla.mindrot.org/show_bug.cgi?id=2876
- https://github.com/google/google-authenticator-libpam
One reply on “SSH Authentication with QR Code PAM”
Great work Sagar, keep it up